
5 Steps to Dewinterizing Your Home (And What to Watch For This Spring)
Spring in the Pacific Northwest is a welcome sight — longer days, blooming trees, and the promise of warmer weather ahead. But before you throw open the windows and call winter officially over, your home deserves a closer look. Months of cold temperatures, heavy rain, and freezing nights can leave behind damage that’s easy to miss — until it becomes an expensive problem.
Dewinterizing your home doesn’t have to be overwhelming. With a methodical approach and a sharp eye, you can catch small issues before they become big repairs. Here are five steps every Pacific Northwest homeowner should take this spring.
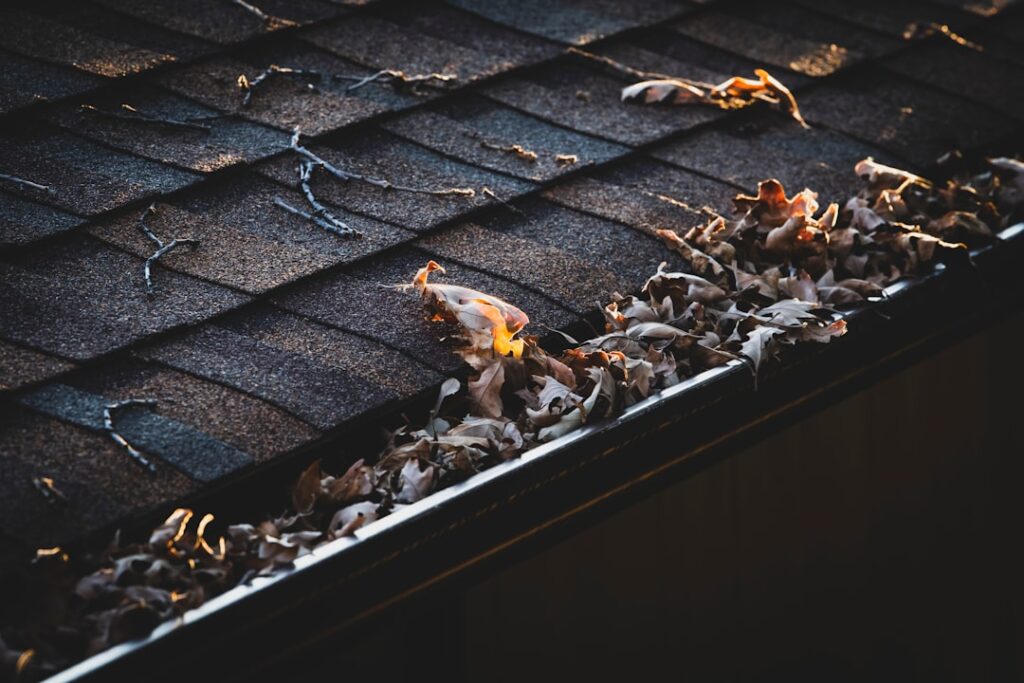
Step 1: Inspect Your Roof and Gutters
Your roof took the brunt of winter — rain, wind, debris, and possibly snow or ice. Start your dewinterization here.
Walk around your home and look for missing, curling, or cracked shingles. Check the flashing around chimneys, skylights, and vents for signs of separation or rust. Inside your attic, look for daylight showing through, water stains, or damp insulation — all signs that water has been getting in.
Don’t forget your gutters. Clear out any leaves, moss, or debris that accumulated over winter. Clogged gutters can’t direct water away from your foundation, which leads to bigger problems down the line. While you’re at it, check that downspouts are firmly attached and directing water at least three feet away from the house.
Step 2: Check Your Foundation and Drainage
The Pacific Northwest’s wet winters mean water is constantly pushing against your home’s foundation. Spring is the right time to assess the damage.
Walk your property perimeter and look for new cracks in the foundation, especially horizontal ones, which can indicate pressure from saturated soil. Check that the ground slopes away from your home — soil can settle over winter, and low spots near the foundation invite pooling water.
Look for signs of water intrusion in your basement or crawl space: efflorescence (white mineral deposits on concrete), damp walls, standing water, or a musty smell. Catching these signs early is far less costly than addressing full foundation damage later.
Step 3: Test Your Plumbing and Exterior Water Sources
If you shut off your exterior hose bibs and irrigation system last fall, now’s the time to bring them back online — carefully.
Turn your exterior faucets on slowly and check for drips, reduced pressure, or water showing up in unexpected places inside the walls. A pipe that cracked during a hard freeze may not reveal itself until the water starts flowing again.
Inspect visible pipes in unheated spaces like garages, crawl spaces, and under sinks near exterior walls. Look for any discoloration, mineral buildup, or signs of a slow drip that went unnoticed all winter.
If you have an irrigation system, run each zone and check for broken heads, uneven coverage, or leaks at the connections before the growing season gets underway.
Step 4: Walk Every Door, Window, and Seal
Winter’s freeze-thaw cycles are hard on caulking, weatherstripping, and window seals. What was tight last fall may have gaps now.
Check the caulking around every window and exterior door frame. Press on it — if it’s cracked, brittle, or pulling away from the surface, it needs to be replaced. Failing seals let in moisture and air, which drives up energy bills and can lead to rot in window frames and sills over time.
Open and close every window. Look for fogging or condensation between double-pane glass, which signals a broken seal and lost insulating value. Check that window locks engage properly — frames can shift slightly over winter and throw hardware out of alignment.
Step 5: Service Your HVAC and Ventilation
As you shift from heating to cooling season, take a moment to service your systems before demand picks up.
Replace your furnace filter if you haven’t done so recently, and schedule a professional HVAC inspection if your system is more than a few years old. Check that all vents and registers are unobstructed.
For homes with crawl spaces, inspect your vapor barrier for tears or displacement — rodents are active in spring and can disturb it. Make sure crawl space vents are open and unblocked to allow proper airflow as temperatures rise.
If your home has a whole-house fan or attic ventilation, verify those systems are operational. Proper ventilation in spring and summer protects against moisture buildup and premature wear on roofing materials.
Don’t Let Small Issues Become Costly Repairs
A thorough dewinterization walkthrough takes a few hours, but it can save you thousands in repairs down the road. The Pacific Northwest’s wet winters are hard on homes — the good news is that most winter damage is very manageable when caught early.
If your inspection turns up something that needs professional attention — whether it’s roofing, foundation concerns, siding damage, or a remodel opportunity you’ve been putting off — Tenhulzen Construction is here to help. Now you’re prepared to be inspired for additions and deck remodels to enjoy the sun that we all hope is coming.
Ready to get started? Contact Tenhulzen Construction today for a free consultation.